|
|
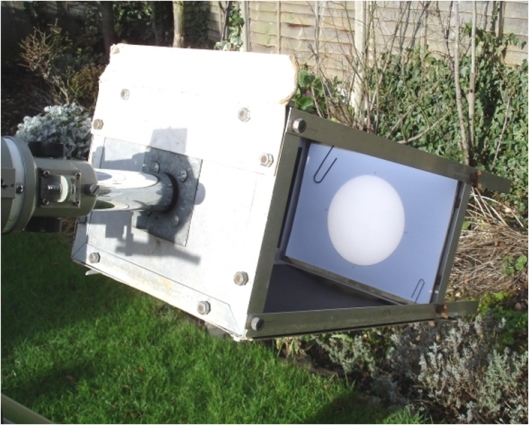
You must be very careful when observing the Sun. Never look directly at the Sun with the naked eye or with any optical instrument. The method I use is to project an image of the Sun using an 80mm refracting telescope on an equatorial mounting. A projection box is attached to the eyepiece holder as shown below. A suitable eyepiece is used to project the whole of the solar disk to the far end of the projection box. Do not use cemented eyepieces as the heat of the Sun will damage them. Details of how to construct a projection box are available in a seperate document (PDF). A sheet of paper with a blank disk is placed at the far end of the box - such blank disks can be found towards the bottom of this page. The north, east, south and west points are marked on these blank disks. For northern hemisphere observers, the N point must be above the S point and the E point must be to the right. For southern hemisphere observers, the opposite is required i.e. the N point must be below the S point and the E point must be to the left. I place a second sheet of paper marked with a number of horizontal and vertical lines behind the blank disk - such backing sheets can be found towards the bottom of this page. One of these horizontal lines is aligned along the blank disk east-west direction to aid in orientating the projection box. The other lines are useful when making the drawing.
The steps to set up the telescope and make a disk drawing are: (a) Check that the telescope mounting is level and correctly aligned; place an eyepiece in its holder and remove telescope cap. (b) Use the shadow of the Sun on the top of the projection box to ensure an image of the Sun appears on your sheet of paper at the far end of box. (c) Focus the Sun and ensure it fits your circle. If it does not, the distance between the eyepiece and your sheet of paper will need adjusting. (d) With the telescope drive switched off, place a small sunspot on one of the east-west lines on the sheet behind the blank disk and let it drift. If the spot moves away from the line rotate the projection box. Once the spot moves along the east-west line note the time. (e) Switch on the telescope drive and place the Sun within your disk circle. You are now ready to draw what you see. I mark the location of a spot in each group first and check they are correctly located within the disk. Then all the other spots are drawn including the outline of penumbral spots. Any faculae present are drawn in yellow. (f) The date and time (in UT) are noted on the drawing as well as the observing conditions. Analysis of the drawing should, if possible, be made later the same day. Such measurements as sunspot number and area can be made.
Blank Disks and Backing Sheets for various disk diameters. Although I have described the projection method, there are other ways to observe the Sun. A article in the magazine Sky and Telescope gives a good summary of how to observe the Sun safely.
Last updated on 02 October 2011. |
